De Novo Binder Design in Bench
INTRODUCTION
Computational protein design has revolutionized engineering a novel protein-protein interaction with specificity and affinity. Our implementation of RFDiffusion for Binder Design, ProteinMPNN, and AlphaFold2 in Bench provides easy access to the state-of-the-art workflow for targeted de novo binder design, pioneered by the Baker lab at the University of Washington. In this workflow, we will demonstrate how you can leverage the latest AI tools for binder design in Bench, beginning with loading in the cancer target, PD1, and ending with a set of novel protein binder structures and sequences for experimental validation. This particular example utilizes known binding residues, also known as hotspots, but these are not necessary for binder design. If you wish to bind a target but have no prior information about a binding site, the Binder Design tool will interpret the surface of the target and select suitable binding sites a priori, providing new structural insight into potential binding sites of interest.
WORKFLOW
Load in the target PDB
-
Open a new Structure Loader tab and enter the PDB ID: 7VUX. Click Accept changes to load in the full bound complex of PD1 and a fragment antigen-binding region (Fab). You can also load in a trimmed pdb by deleting the Fab domains that do not contact PD1. Additionally, you can upload a PDB file from your computer or load in a structure from another Bench project.
-
Create a selection for just PD1 (Chain A).
-
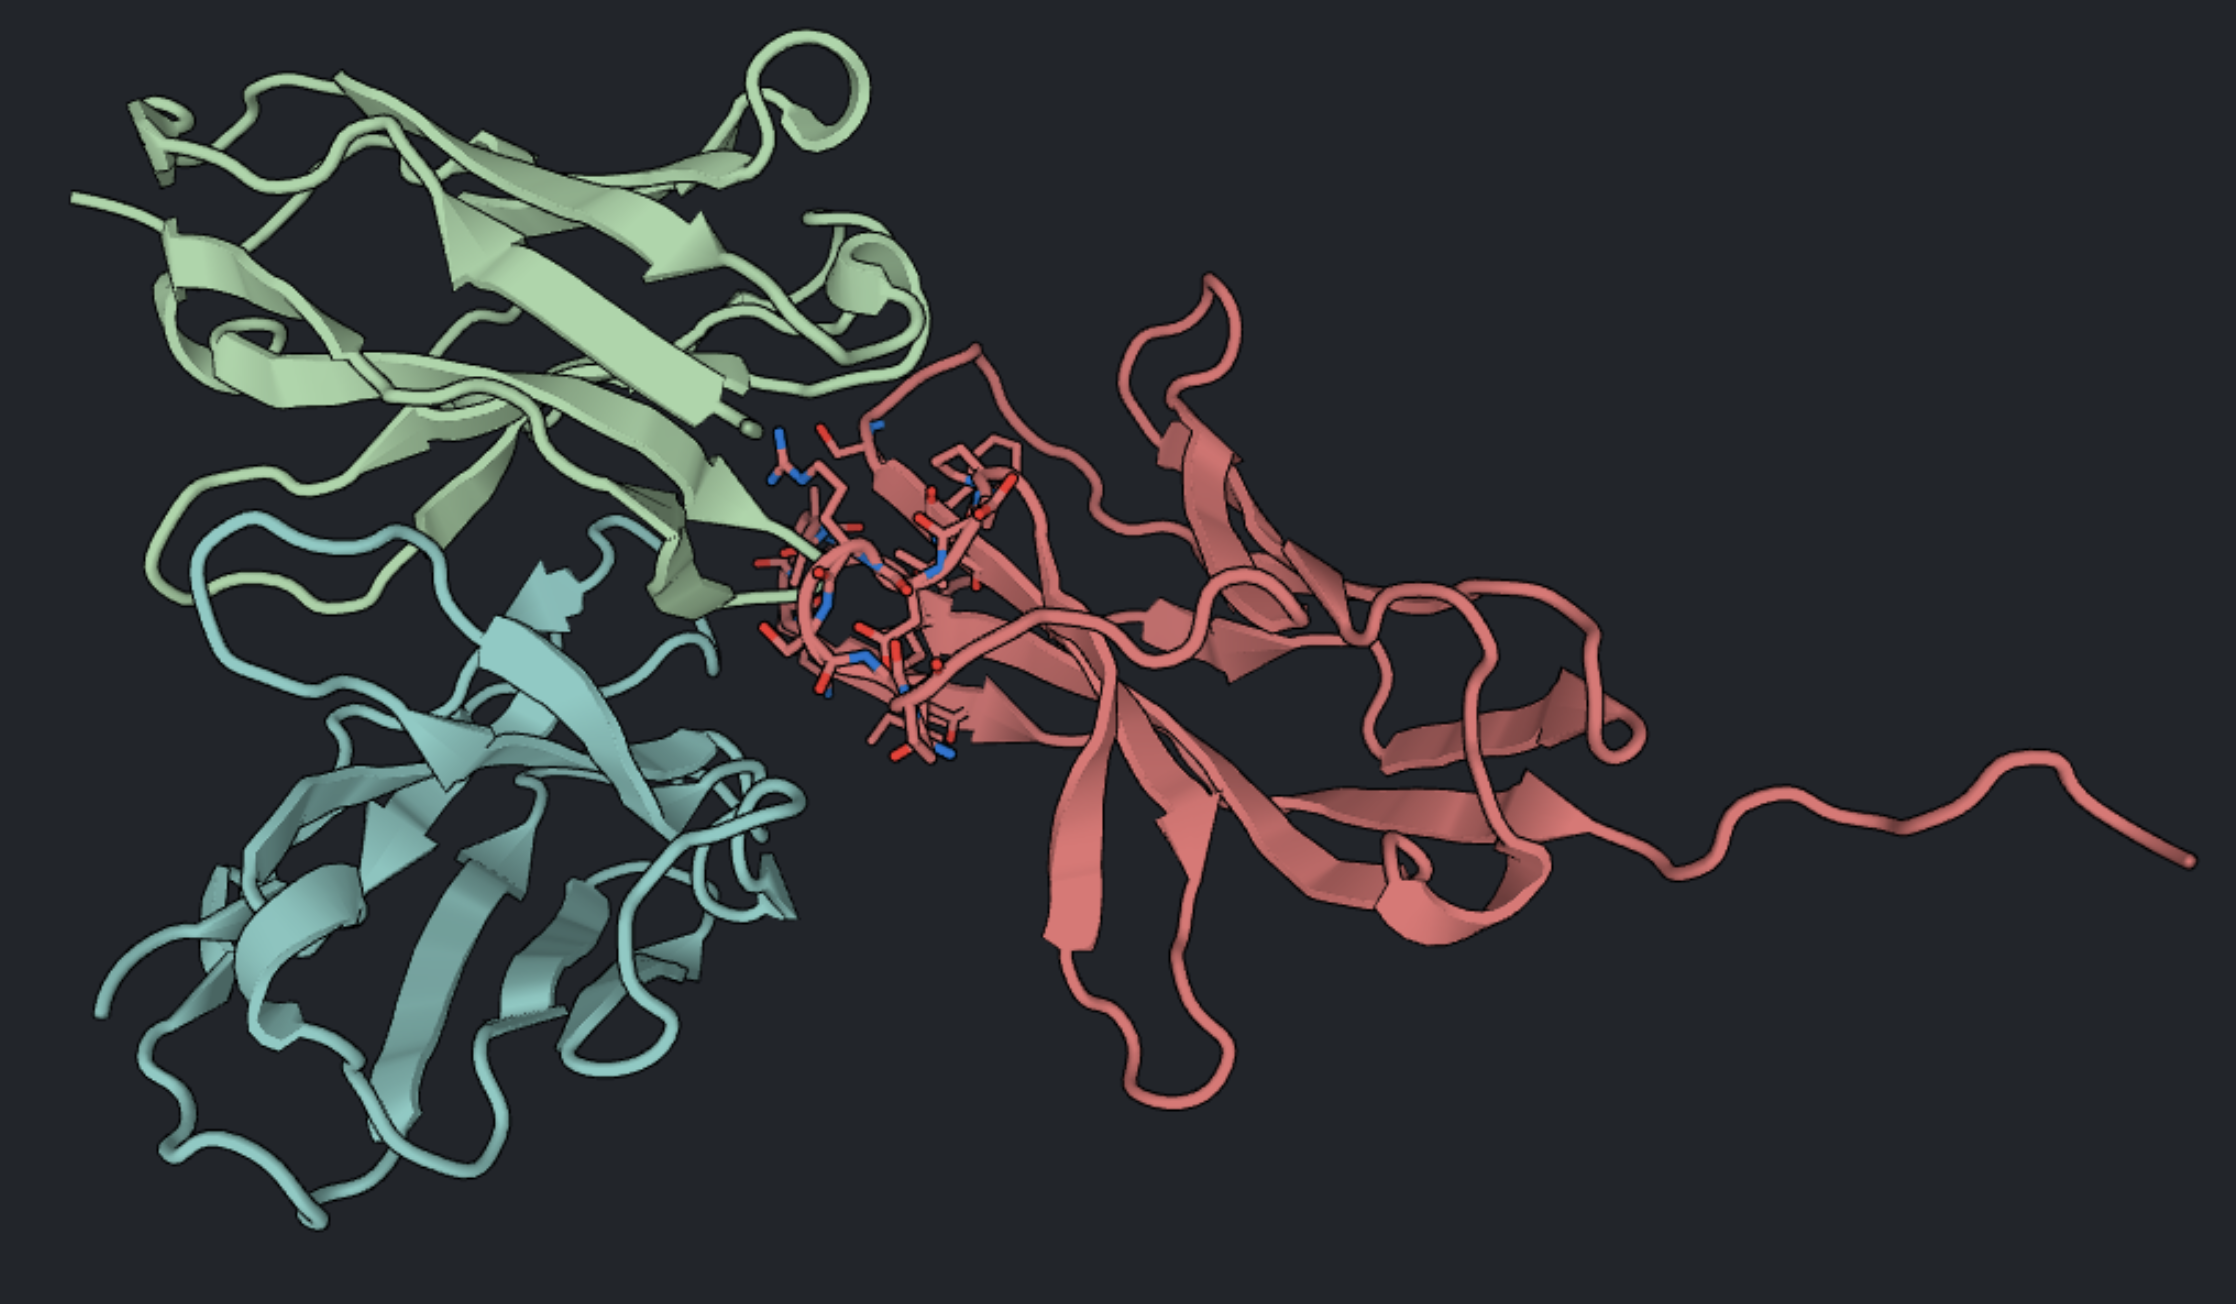
Create a selection within PD1 for the known binding residues, also known as hotspots. You can use the Structure Viewer to select these hotspots based on direct contact with the Fab in Spheres mode. PD1 is shown here in red with hotspots displayed as sticks; the Fab is shown in green and blue.
Binder Design
-
With the checkbox to the left of 7VUX checked, select the Binder Design action to open a new Binder Design setup tab.
-
In the Target Selector dropdown menu, select “PD1”. This selection will be fixed during Binder Design.
-
In the Hotspot Selector dropdown menu, select “Fab hotspots”. This selector will bias the binder interface to these positions on the target.
-
Enter a minimum and maximum binder length in the Binder Length Range fields (inclusive). To make a miniprotein binder, enter the range of 30 to 65 amino acids. To make a binder with an exact length, enter the same number as the minimum and maximum length (ie. 60-60 amino acids).
-
Enter the number of designs you want to generate in the Number of Designs field. 10 designs will sample several binder topologies to this beta-sheet dominant target. If you want to generate a larger and more diverse sample of diverse binders, you can optionally generate up to 100 designs.
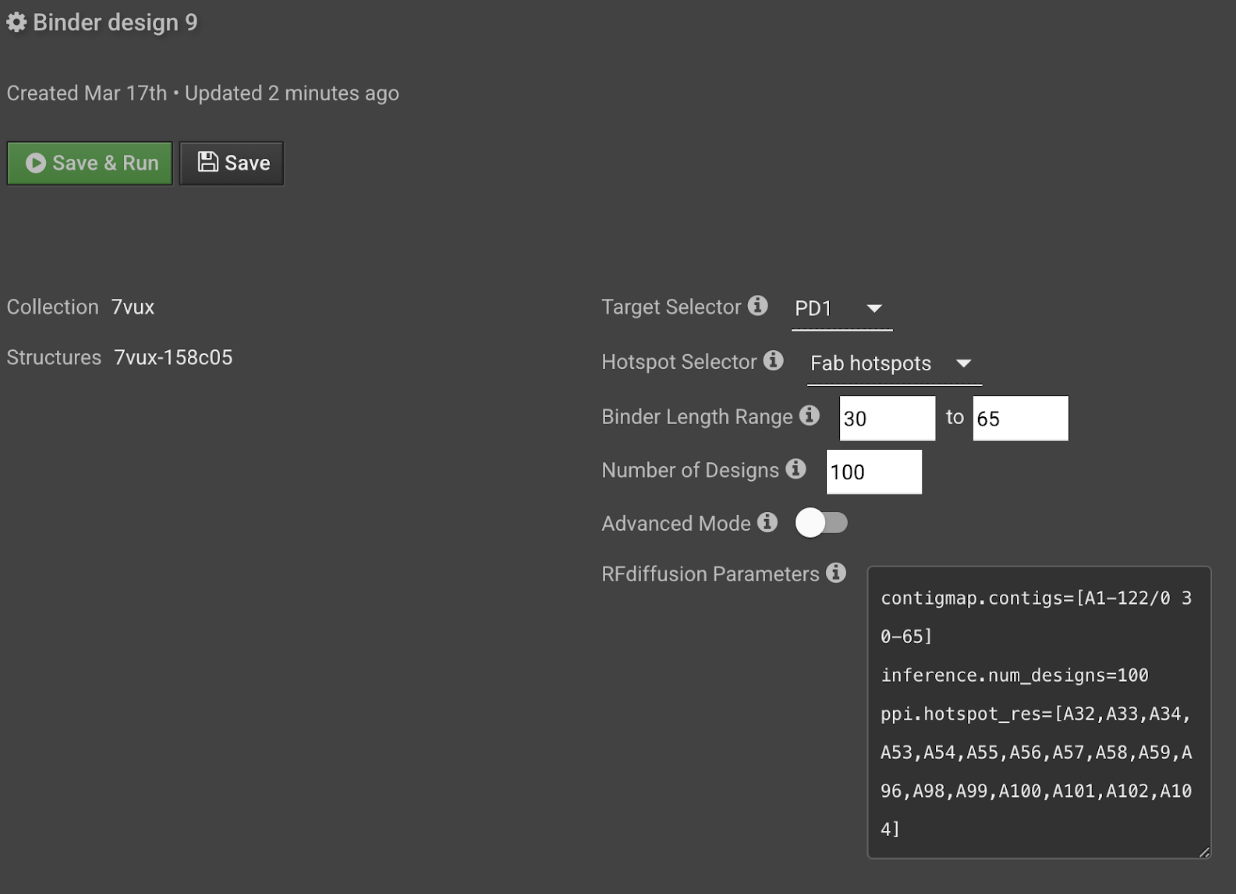
The RFDiffusion parameters will populate in the textbox below the selector and length fields. You can edit this text to modify your run parameters by toggling Advanced Mode on. Note: You can anticipate the cost of this step by accounting for the length of the target and binder. For example, if the total size (length of target + average length of binder) is 150 residues or less, then the run will cost 0.05 credits per design. If it is 300 residues, the cost per design will double.
- When you have finished entering your desired run parameters, select Save and Run in the top left corner of the setup tab.
Select the best binder backbones
-
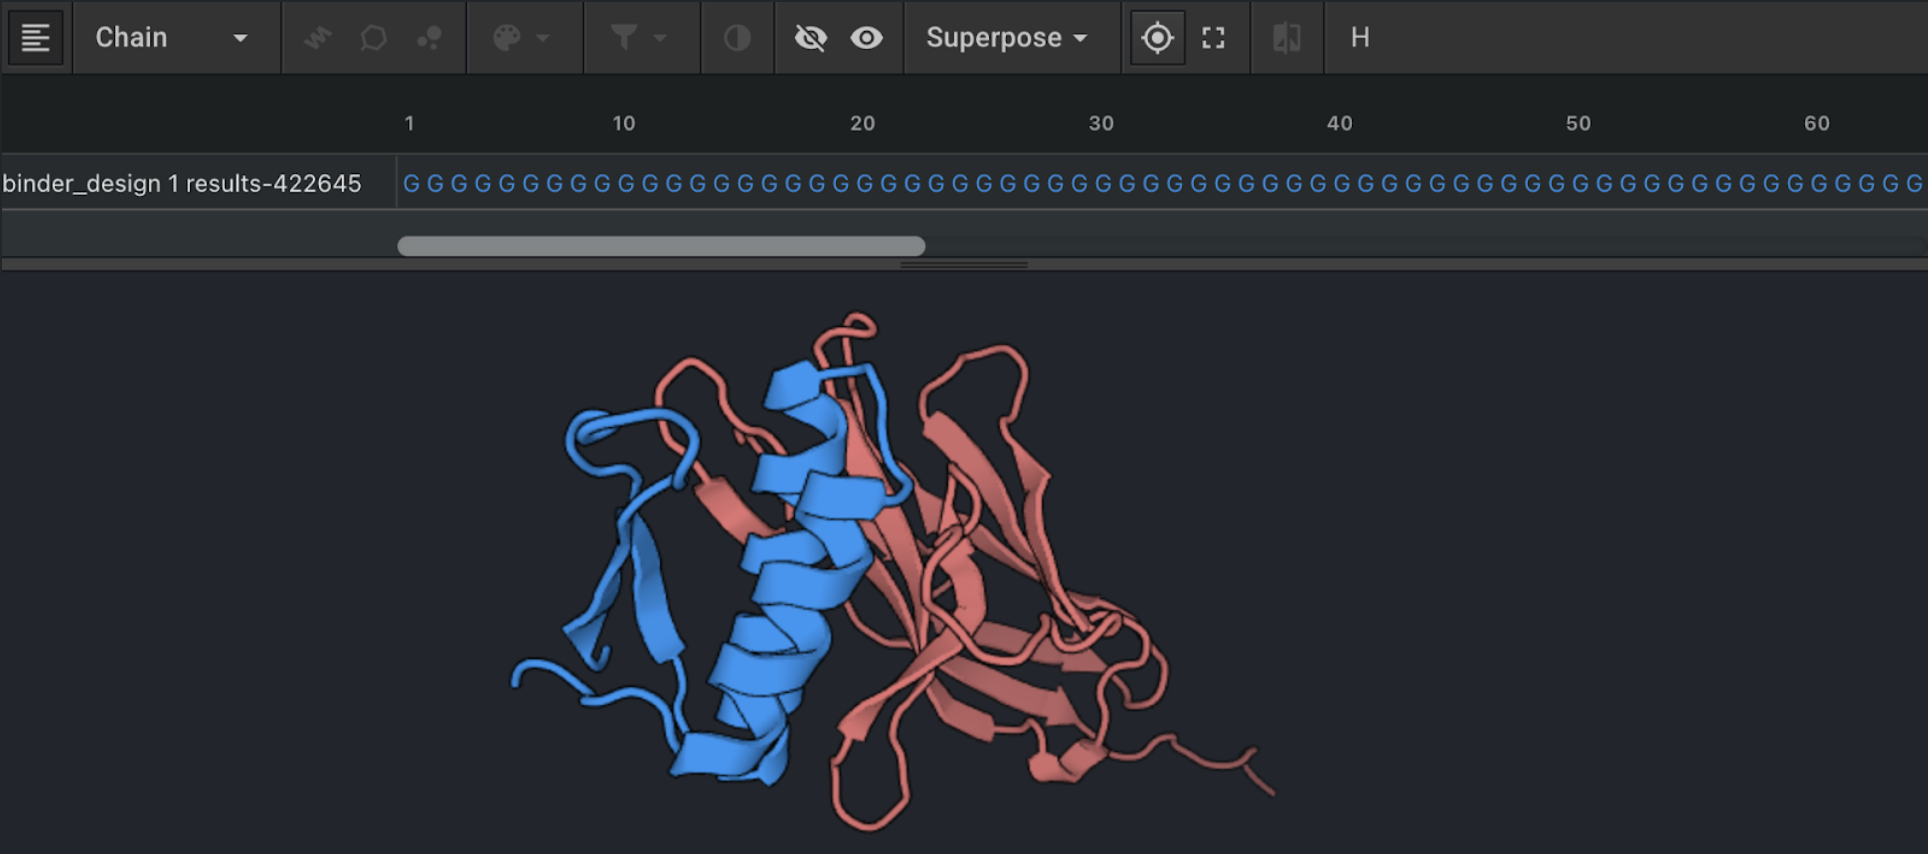
Once the Binder Design job has finished, the results will appear in the Structures panel. Use the eye icon to the left of each output name to visualize the output in the Structure Viewer. The binder will be chain A and lack side chains, therefore represented with a poly-glycine sequence. The target will be chain B.
-
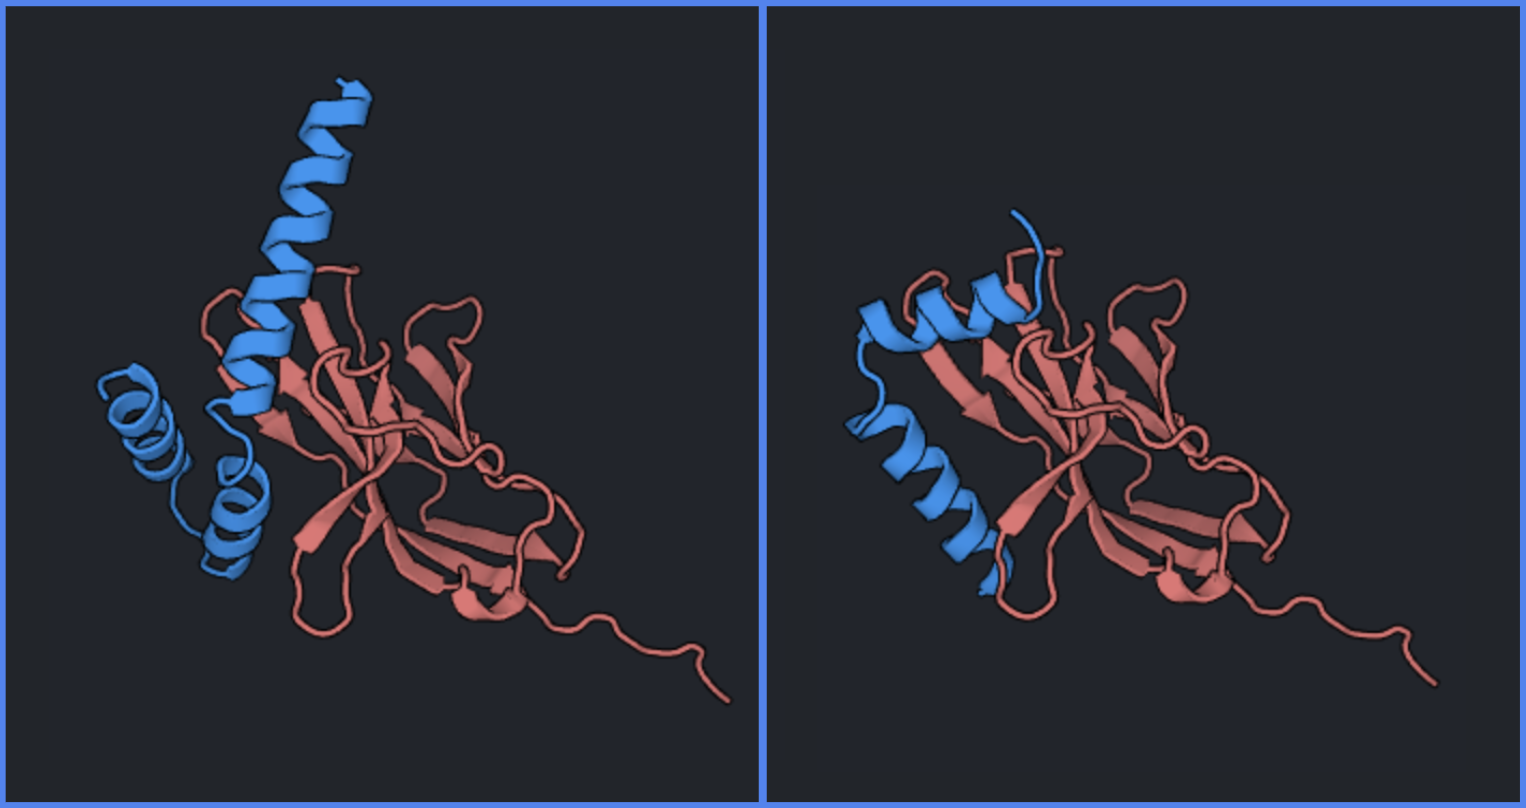
Poor backbones generated by RFDiffusion tend to lack a protein core or include extended secondary structures that do not make additional contact with the target. You can note such backbones (see two examples below) and filter them out of the pipeline at this stage.
-
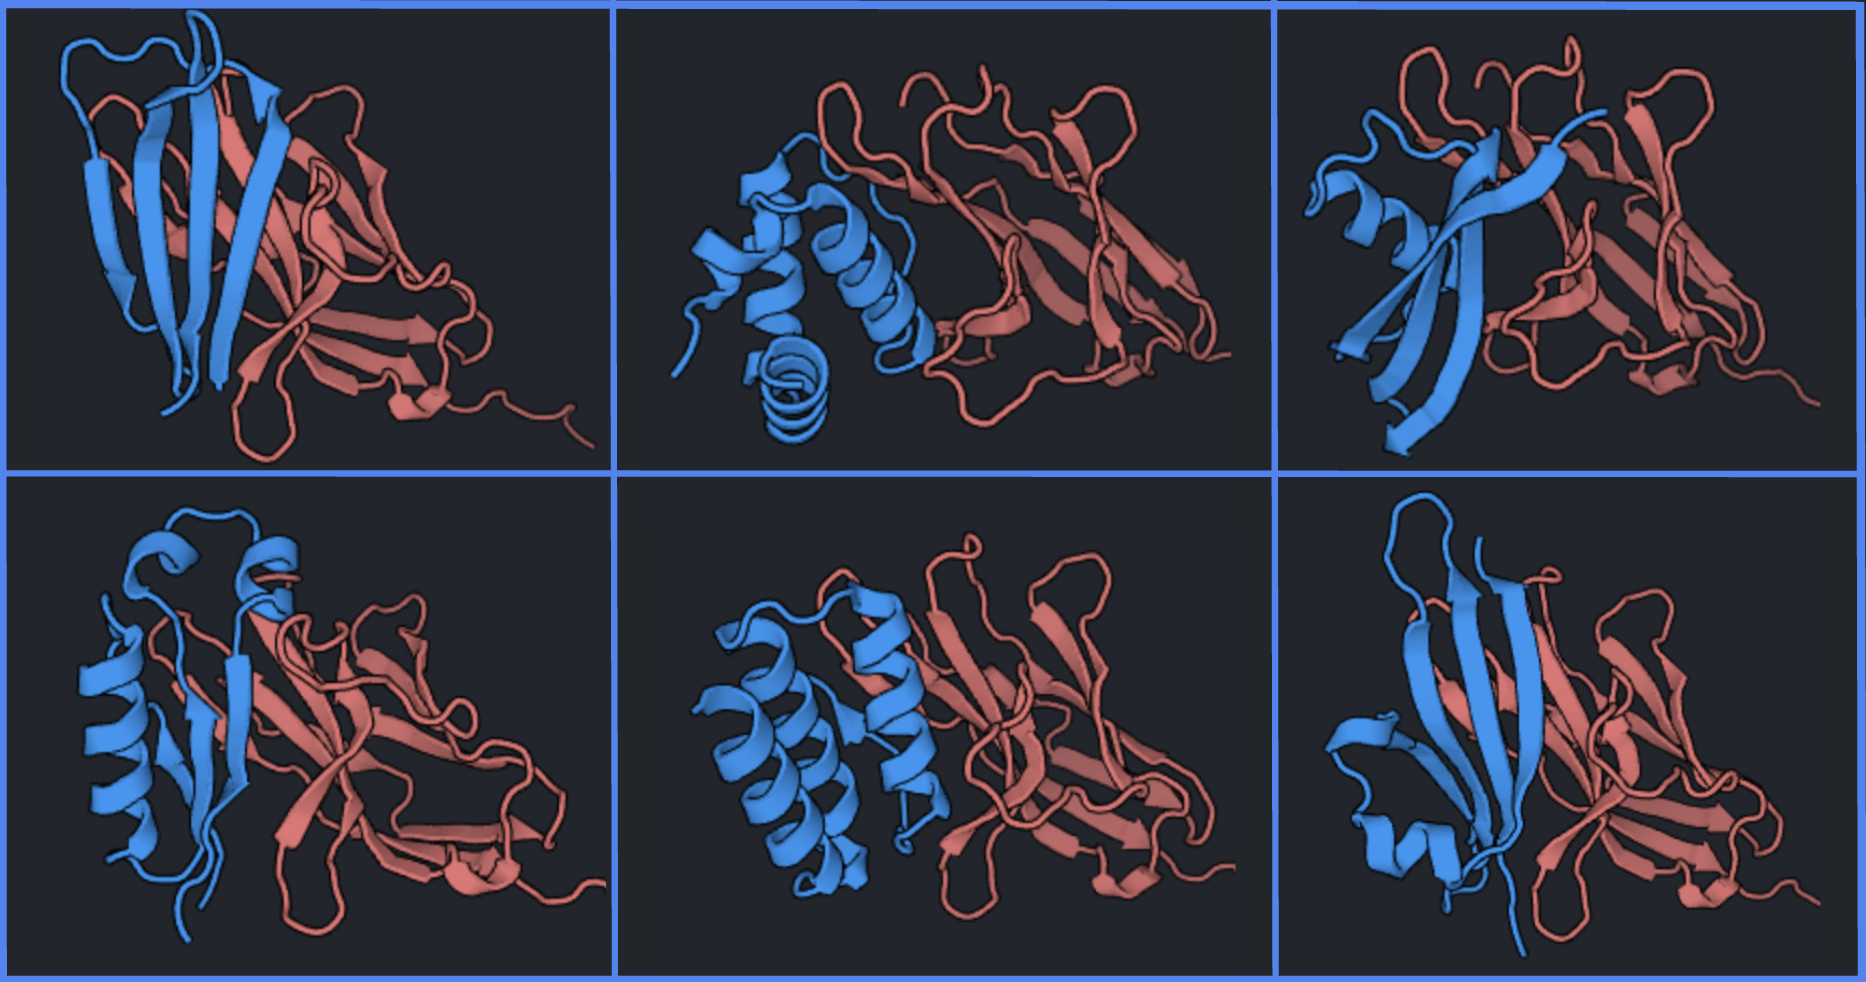
Decent backbones will be well packed, both as a monomer and in complex with the target (six examples shown below). You can select outputs with a variety of topologies to increase structural sampling during experimental validation.
-
In this workflow, one backbone has been selected to continue the in silico pipeline, but it is common to pass 2-10 backbones to the next step in the pipeline. If you are following along, choose the best 2 backbones for the next step.
ProteinMPNN for sequence design
-
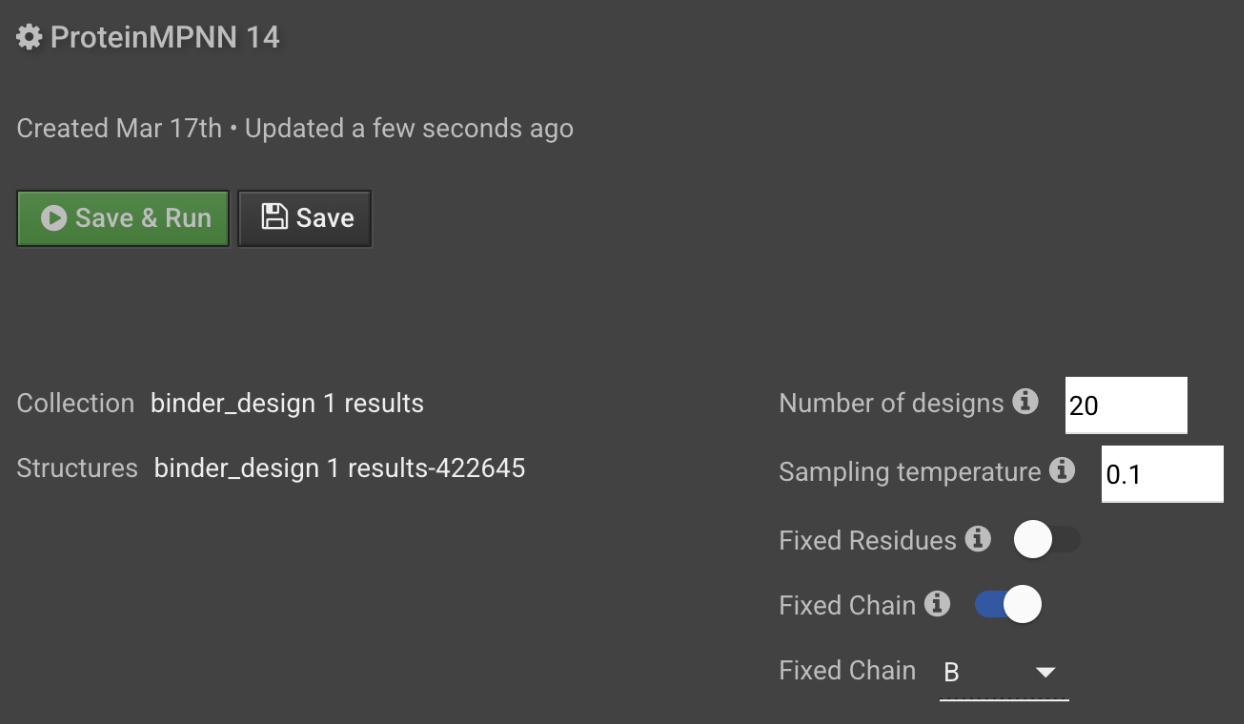
With the checkbox to the left of the desired Binder Design output checked, select the ProteinMPNN action to open a new ProteinMPNN setup tab.
-
Generate 2 sequences per backbone in the Number of designs field. Optionally, you can increase the scale at this step by asking for 2-10 sequences per backbone.
-
The default sampling temperature is 0.1. To increase the diversity of outputs, increase sample temperature. A sampling temperature of 0.1-0.3 is common for de novo binder design.
-
Since we are using an input structure that includes the target protein, we need to fix portions of the input sequence during design. To fix the PD1 sequence, toggle Fixed Chain on and select B from the dropdown menu.
-
When you have finished entering your desired ProteinMPNN run parameters, select Save and Run in the top left corner of the setup tab.
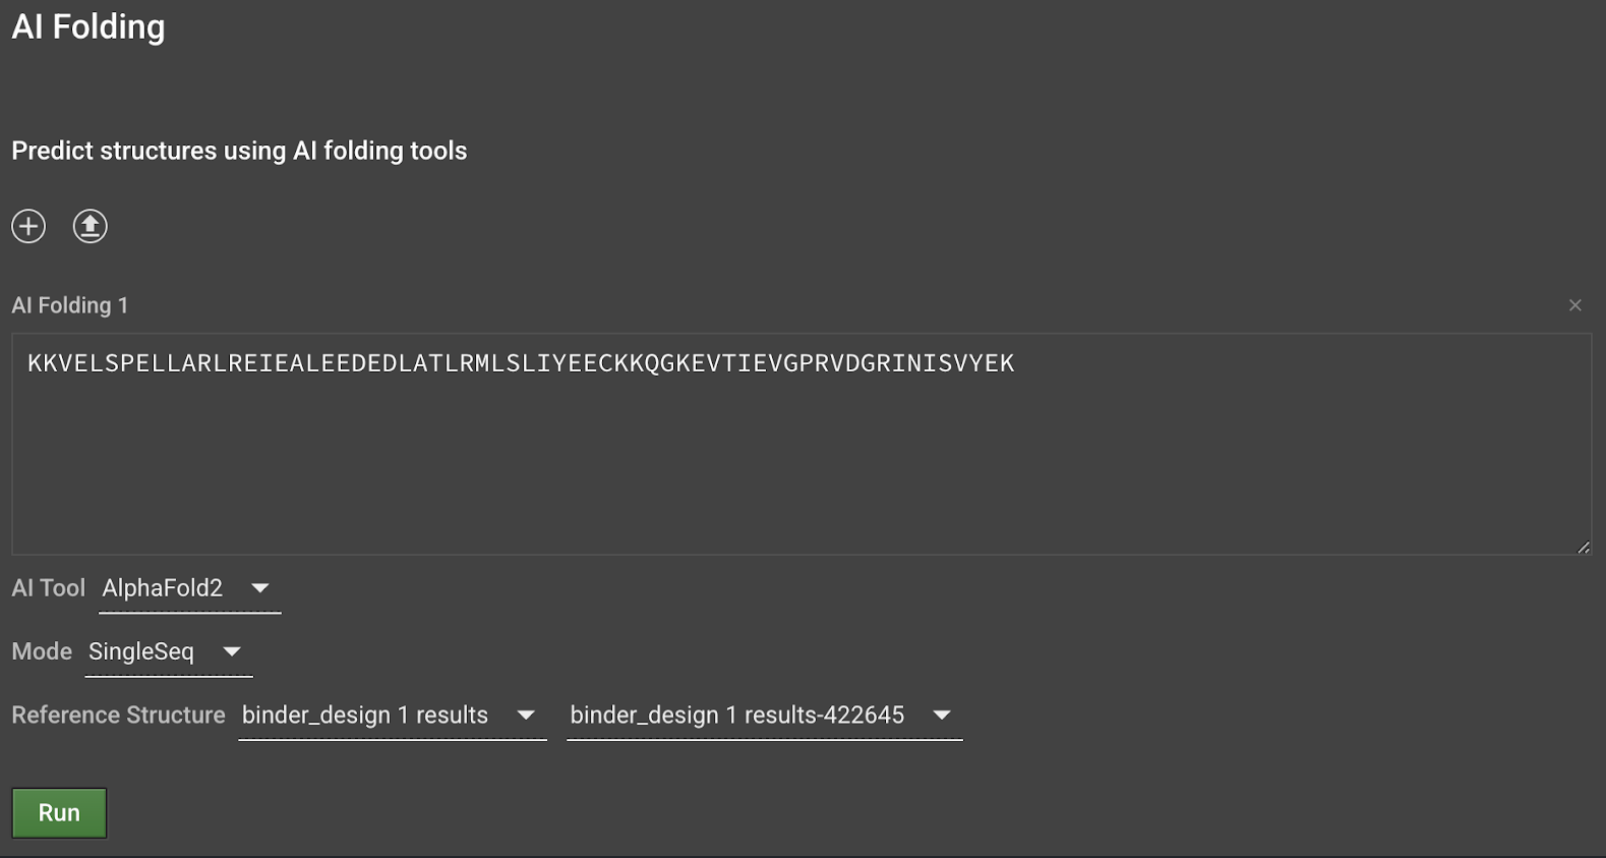
AlphaFold2 Single Seq to predict binder structure
-
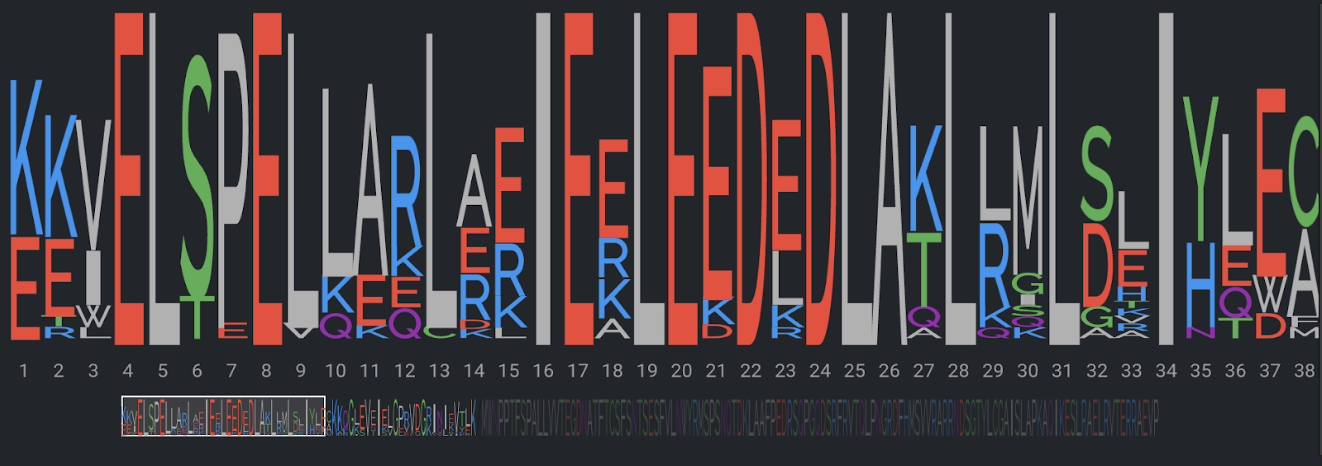
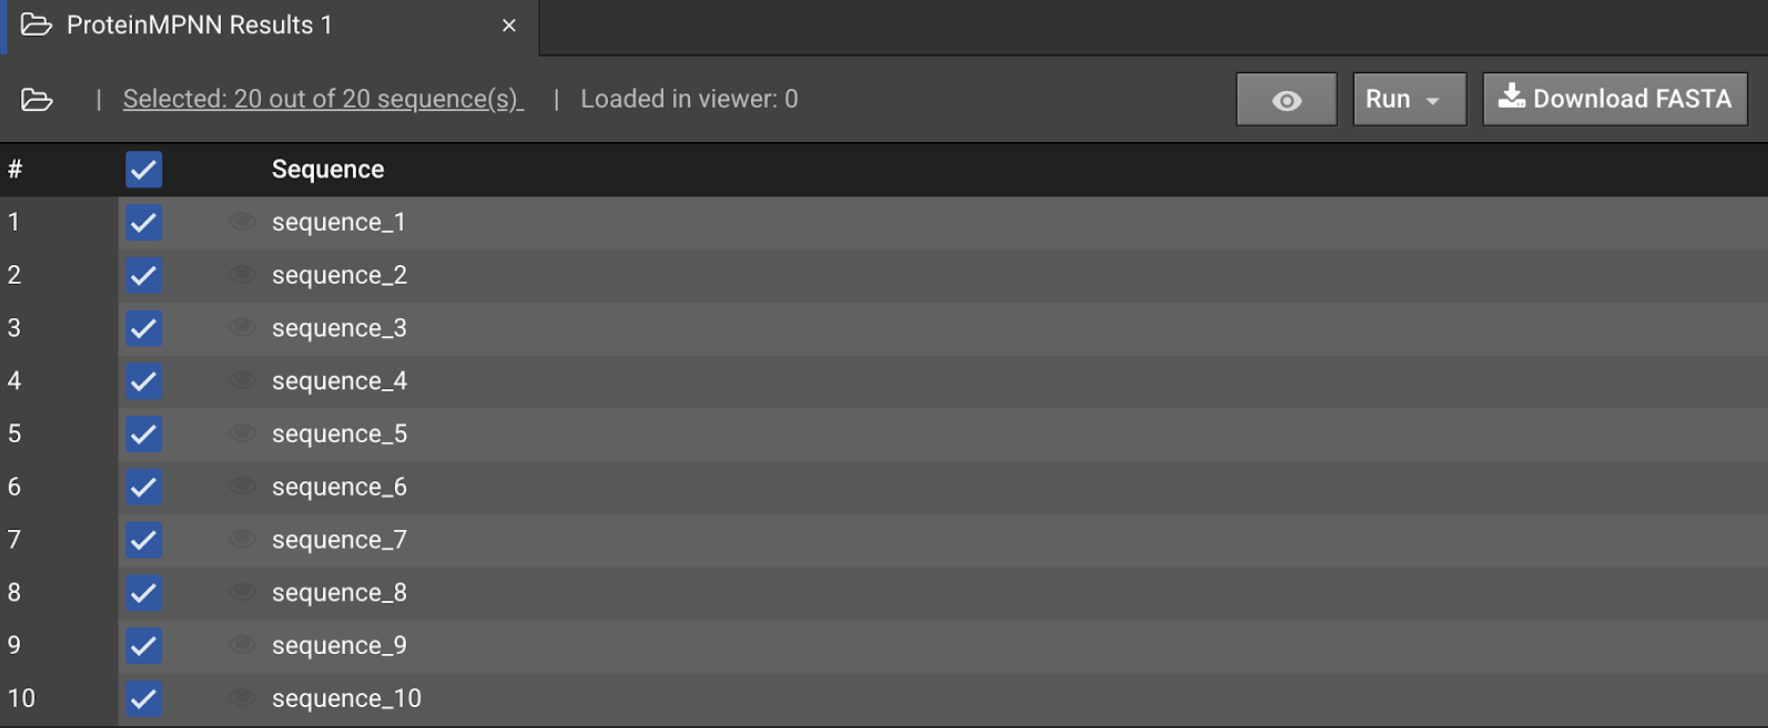
When ProteinMPNN is finished, the results will appear in the Sequences panel. Open the results to view the sequences as a Sequence Logo, where the frequency of an amino acid is represented as its letter height per position.
-
Select the top checkbox to select all sequences in the collection and select Run to open a dropdown menu of AI folding options. Select AlphaFold2 (Monomer) to open a new AI Folding setup tab.
-
Delete the PD1 sequence and the forward slash to predict just the binder and select SingleSeq from the Mode dropdown menu. This will run AlphaFold2 Monomer without a multiple sequence alignment since sequences designed by ProteinMPNN do not have homology to sequences in nature.
-
Optionally, download the correponding Binder Design result (which should be a poly-glycine protein backbone)and upload the binder chain only (ie. chain A) to use as the Reference Structure for AlphaFold2 SingleSeq. The reference structure must match the input sequence length. This will give outputs an RMSD metric, calculated between the predicted structure and the input binder backbone. Smaller RMSD values indicate that the predicted structure is more similar to the input binder structure.
-
Repeat steps 3-4 for each sequence then select Run to submit all jobs.
Validate the bound complex structure with Relax Design
You now have monomer structures from AlphaFold2. An optional step described below is to perform AlphaFold2 Multimer, which uses the model trained on complexes. Good designs may not fold into the designed complex depending on the prediction quality of the target and the lack of evolutionary information available for your novel binder sequence. Therefore, an alternative validation of the bound complex structure utilizes Relax Design on the RFDiffusion backbone with a convenient CSV input to modify the poly-glycine sequence to its ProteinMPNN counterpart. You can download this CSV using the Design setup tab.
-
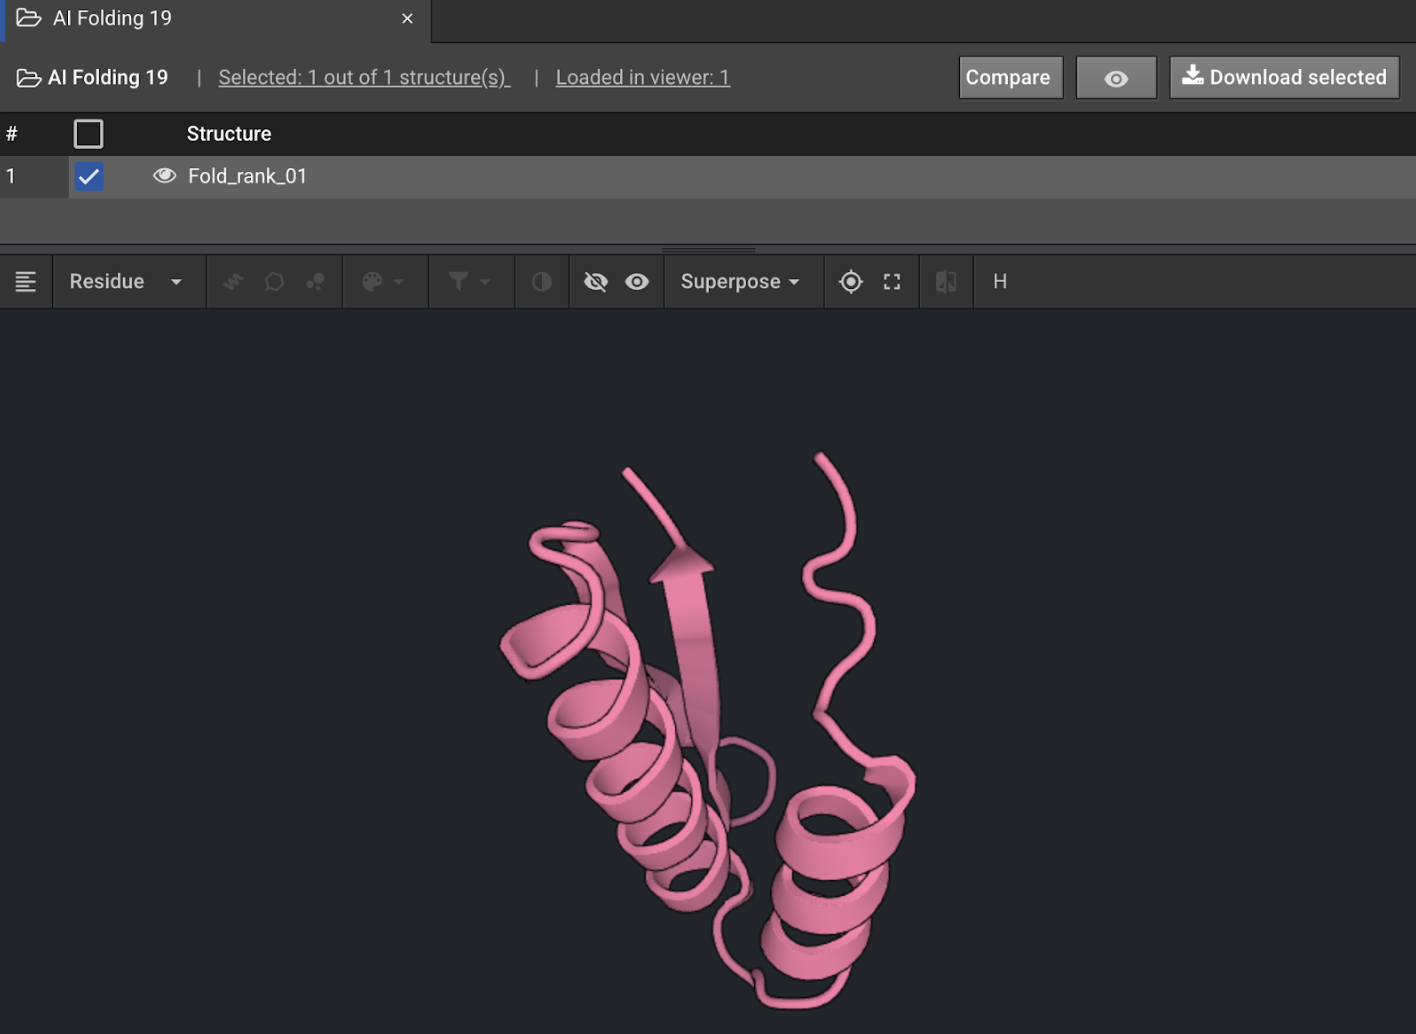
When each AI Folding job is finished, it will appear in the Structures panel. Use the eye icon to view the folded structure and validate that it is in the expected fold before continuing with it, since some structures at this stage may be poorly folded. Such outputs are usually filtered out at this stage. With the checkbox of the desired AI Folding output checked, select Design from the actions panel.
-
In the Design tab, select Download mutations to download a csv called
design_X_mutations.csvcontaining the designed sequence.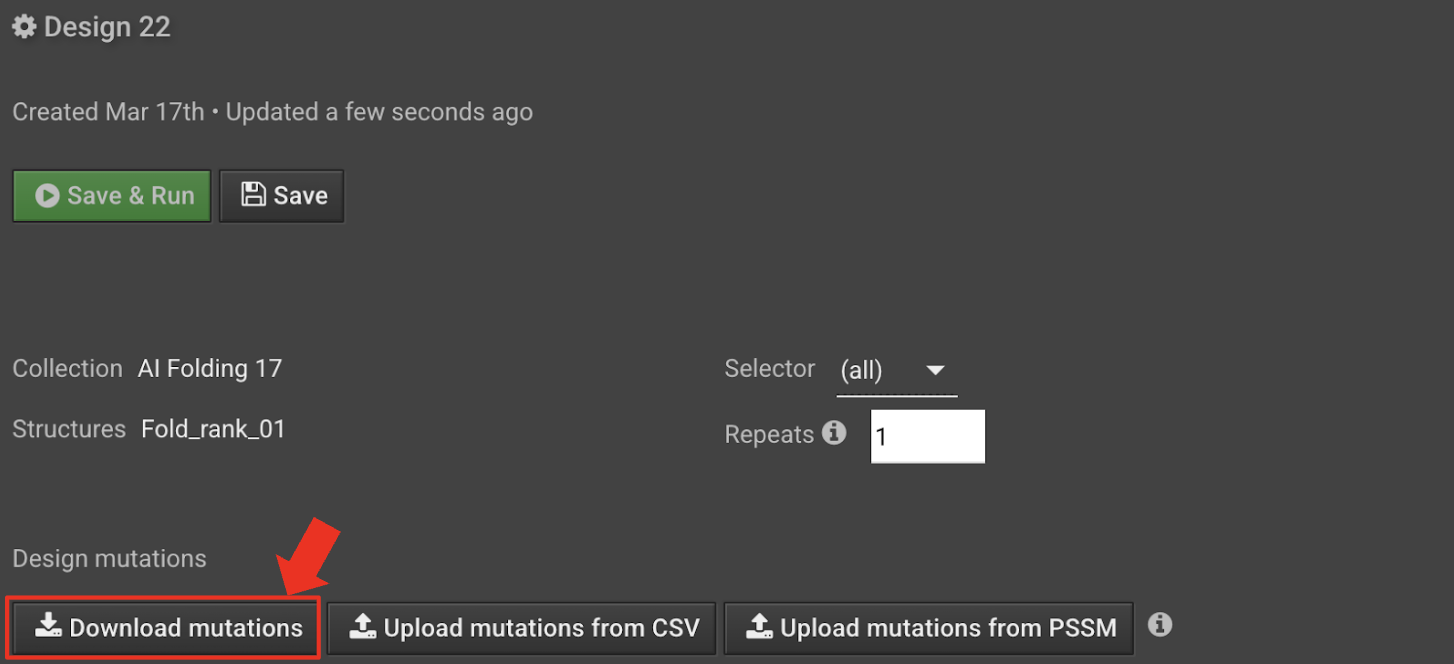
-
Close the Design tab. Open your Binder Design results from the Structures panel and check the box next to only the backbone that was input to ProteinMPNN to generate the sequence you just downloaded in step 2.
-
Choose Relax Design from the Actions panel. In the Relax Design setup tab, select Upload mutations from CSV and upload the
design_X_mutations.csvfrom your files.
-
Select Save and run to submit the Relax Design job. Relax design is a Rosetta-based protocol that uses Monte Carlo sampling to move a protein into new conformations for energetic minimization. It will also report the RMSD of the output to its pre-design input, allowing you to quantify how closely your AI-predicted complex structure matches your designed complex structure.
-
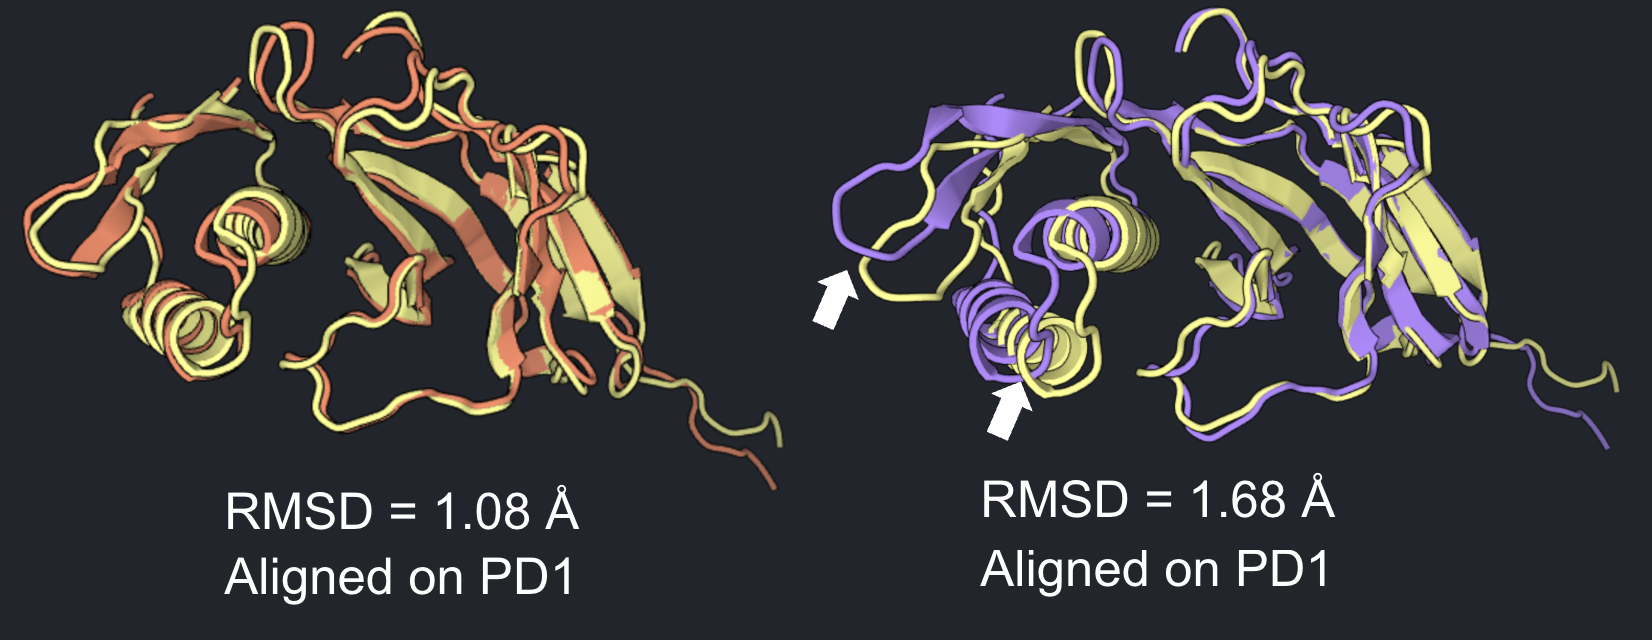
Relax Design results will appear in the Structure panel when the job has finished. Compare the RMSD of Relax Design outputs, with lower RMSD being better.
-
Visualize RMSD as alignment quality. With the Relax Design result visible in Structure Viewer, select the Compare button near the top of the tab. Select the Binder Design job from the menu. Align the two structures via PD1 by first clicking both Chain B’s using Chain mode (Residue dropdown menu of Structure Viewer) then selecting Superpose by Selected backbone atoms. There will be a greater misalignment for high RMSD results than for low RMSD results.
-
For Relax Design results, we rank designs my RMSD. For the best ranked designs, click the checkbox and select Download selected to download the design PDB or fasta file. Depending on your experimental testing capacity, you may want to order and test 10-20 designs, identify the best ones to perform computational affinity maturation, and iteratively improve binding.
An example of using Relax Design to improve binding affinity is available in our tutorials.
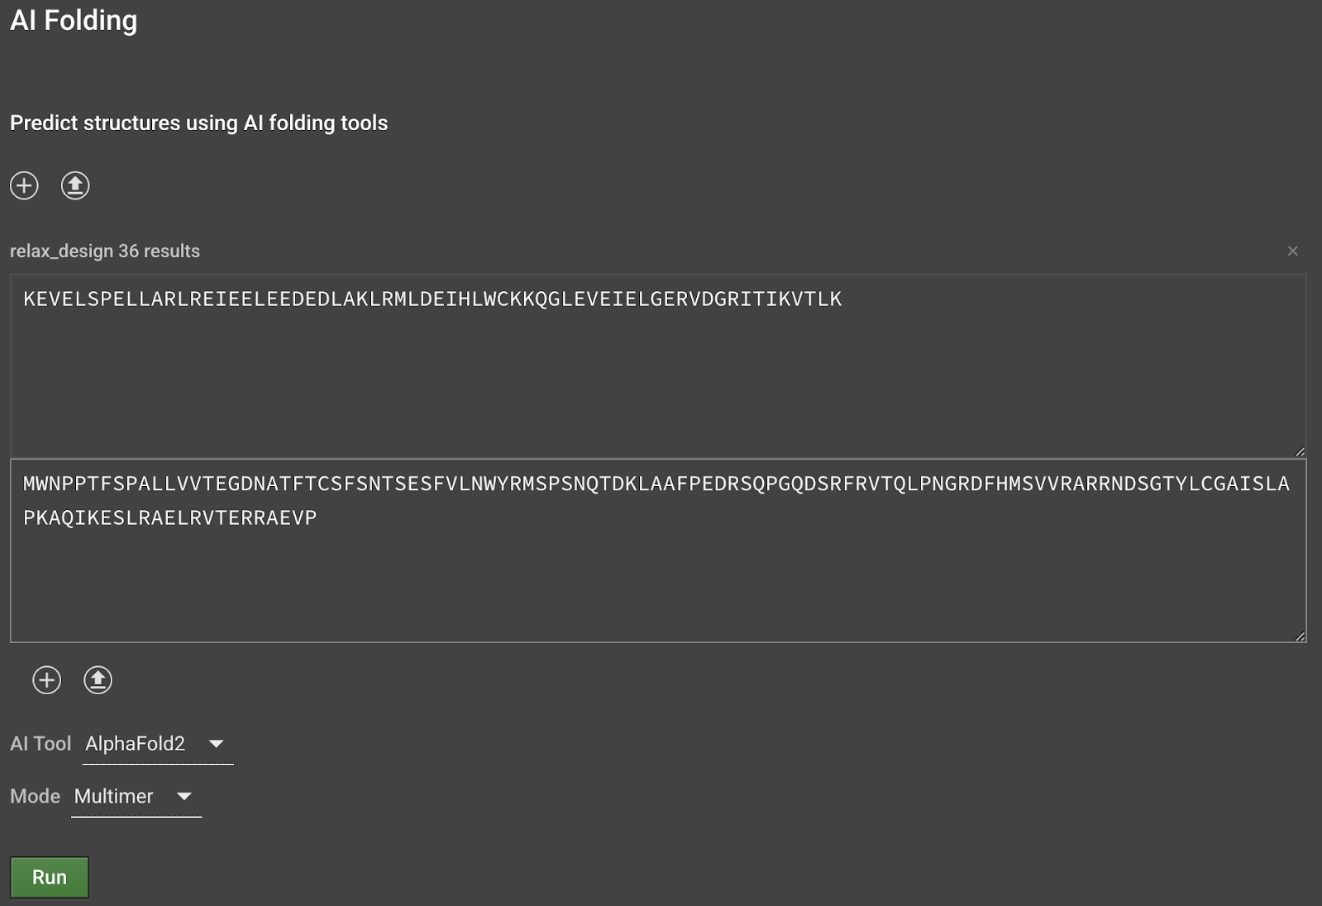
Optional: AlphaFold2 Multimer
-
You may want to check if your binder and target are predicted to bind with AI Folding. Download the complex fasta from the relax design results.
-
Select the AI Folding button in the Structure Prediction panel. Upload and copy the fasta file that you just downloaded in step 1 and select Multimer mode to enable multiple chains. Paste the sequence of chain A in the top box and the squence of chain B in the bottom box.
-
Select Run and compare the outputs as above. You can compare the Relax Design output to the AlphaFold2 Multimer output with the Compare tool to first show both outputs in the Structure Viewer and the Superpose tool to align them by backbone atoms.
REFERENCES
Watson, J.L., Juergens, D., Bennett, N.R. et al. De novo design of protein structure and function with RFdiffusion. Nature 620, 1089–1100 (2023).
Dauparas, J. et al. Robust deep learning-based protein sequence design using ProteinMPNN. Science 378, 49–56 (2022).
Jumper, J., Evans, R., Pritzel, A. et al. Highly accurate protein structure prediction with AlphaFold. Nature 596, 583–589 (2021).
Mirdita, M., Schütze, K., Moriwaki, Y. et al. ColabFold: making protein folding accessible to all. Nat Methods 19, 679–682 (2022).
Conway, P., Tyka, M.D., DiMaio, F., Konerding, D.E., Baker, D. Relaxation of backbone bond geometry improves protein energy landscape modeling. Protein Sci 23, 47-55 (2014).