Tutorial 1: Create Project, Load Structure, Prepare, Viewer, Compare Structures
Estimated time: 30 minutes
This tutorial will teach you how to begin working with a structure in Cyrus Bench, including the different ways structures can be displayed and how structures can be compared to each other. The Prepare tool, Structure Viewer, display modes, inverse selector, Compare tool, Scores, and the Superpose function will be introduced.
1.) Open or create Project
From https://cad.levitate.bio, click on  if you are running this tutorial in a new project. Then enter a name and click
  . Or click on an existing project.
2.) Load structures
If Structure Loader is not already open in the center window, click  . A tab in the center window should appear that is titled . Under
  , enter this PDB ID
  and click
  . The structure will appear in the list in the middle, lower window:

The spinning  indicates that it is loading and will become a
  when it is done. After structures have loaded, they will be listed in the left window like this:

Repeat the process to load PDB ID 2JUA which will be used at the end of this tutorial. 2JUA is a 77% homolog to 1P68 and will be used to show the structural similarities.
3.) Prepare Structures
Many structures will require further processing before you can have confidence that they are optimal. One of the simplest ways to improve a structure is to run Prepare. For more info on Prepare, click here .
First, Prepare will be run on 1P68. Click on the 1P68 folder in the left window in order to bring it into the center tab…
Click the  to the left of the structure name in order to select it. Then in the right window, click
  . This will open a Prepare tab in the center window:
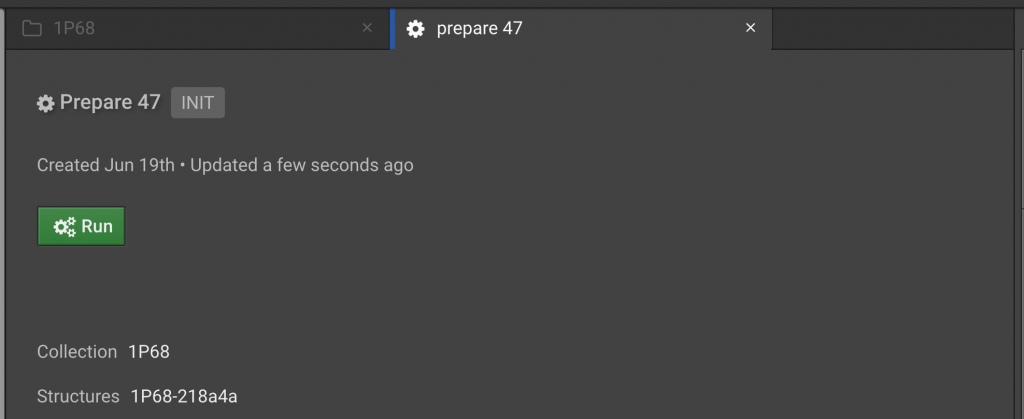
Click  . Repeat this procedure for 2JUA. The job will appear in the right window in the Task section:
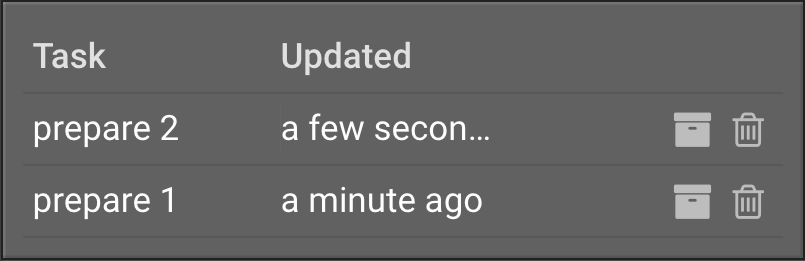
The will appear once the job is finished. The finished jobs will appear in the left window. It may take a few minutes for this to run. Click the  to the right of the prepare results files and rename them like below:

4.) View Structures
In the left window, click  in order to bring it into the center tab:
To the left of the word structure one, click the  in order to bring the structure into the Structure Viewer in the lower center window:
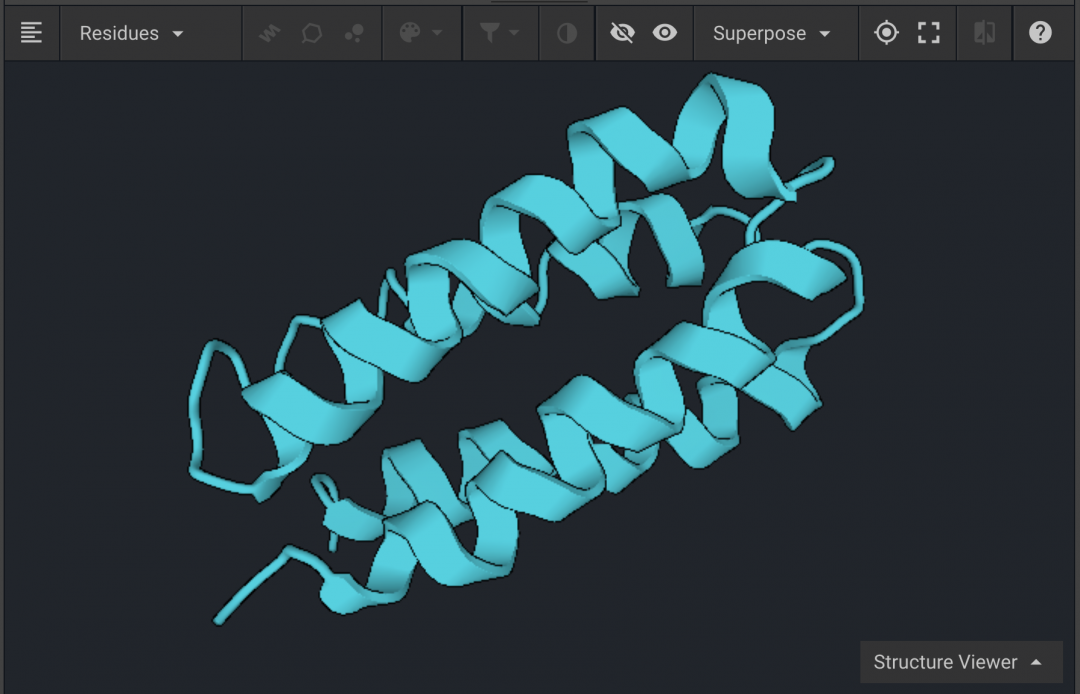
Above the structure is a bar with several buttons that we will discuss. You can increase the size of the Viewer by dragging the  above that bar upwards.

You can also go into Full Screen mode by clicking  . Exit by hitting Esc. If the protein is not centered in the Viewer, click
  . Click and drag inside the Structure Viewer in order to change the protein’s orientation. Click
  in order to bring the sequence into view.

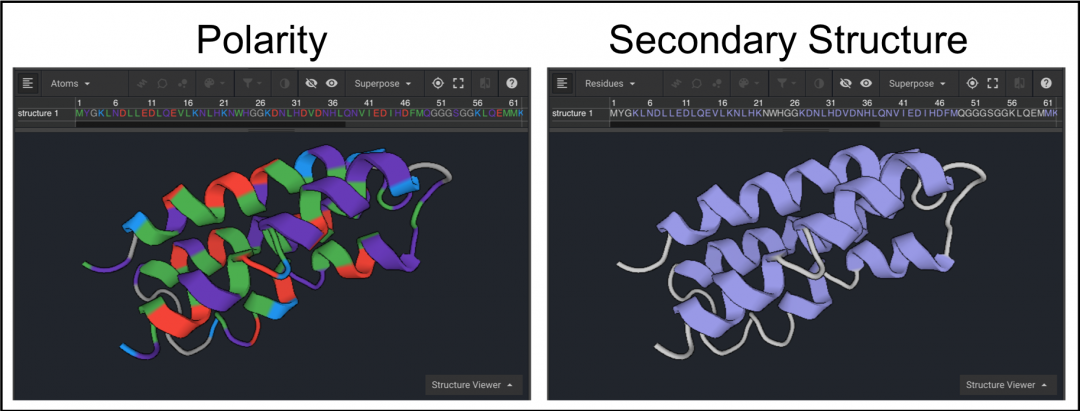
Change Structure Display Mode and Color
Click  in order to highlight the entire protein. You can also do this by double-clicking anywhere on the structure. Click
  to bring a drop down window that allows you to color by CPK, Secondary Structure, Polarity, or chose a color. Select Polarity (below left) and Secondary Structure (below right), one at a time, to see how it changes the structure. Click on empty space to deselect everything.
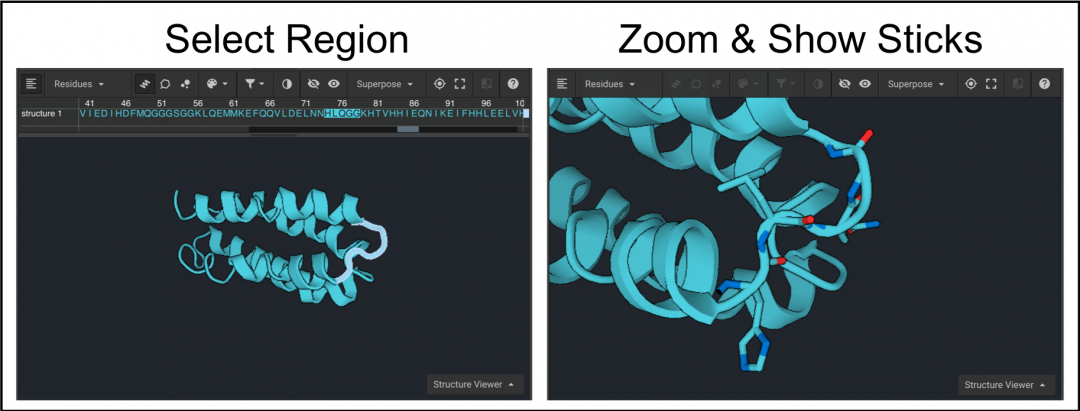
Next, scroll to the right half of the sequence and select residues 74-78 using the dark scroll bar under the sequence (below left). Click in order to center the loop. To present residues 74-78 as sticks once they have been selected click  . Click to remove the sequence from the Viewer (below right).
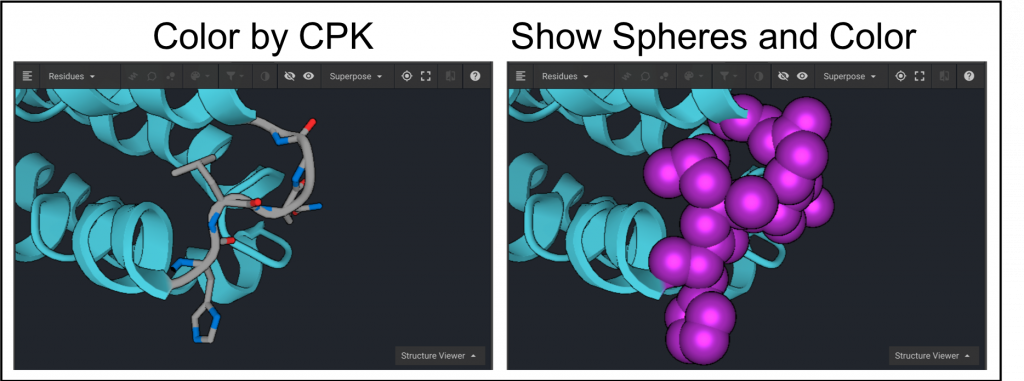
The sequence can be hidden from view by clicking as shown above. Select residues 74-78 from the structure again and click . To see atomic coloring select CPK from the drop down menu(below left). To display the atoms as colored spheres click  and then click to select a color as shown below on the right.
Resetting Structure Viewer
To reset the Structure Viewer close out the  tab to close the window. Select the structure again from the list in the left window and click in order to bring the structure into the Structure Viewer in the lower center window.
Using the Inverse Selector to Display Structure
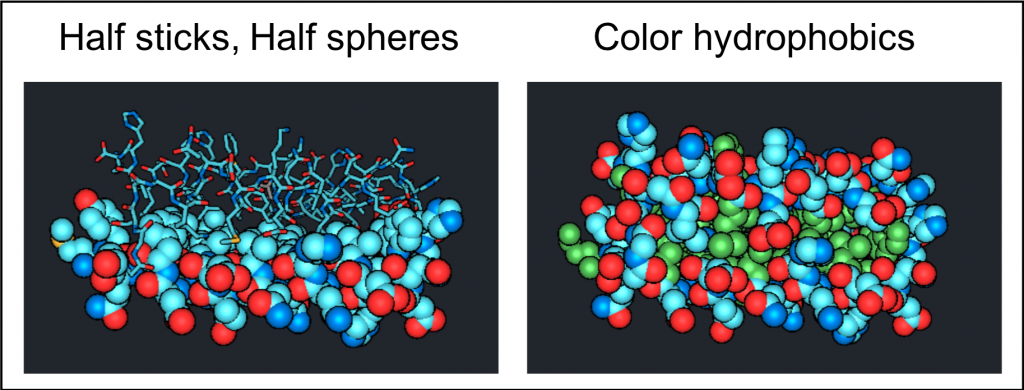
Highlight residues 51-102 and click  in order to hide the cartoon mode for this region. Click to present the residues as sticks instead. Click
  , which will reverse your selection to the remaining residues 1-50. Click in order to hide the cartoon mode for this region and click to show spheres. Half of the structure should now be displayed as sticks and the other half should be displayed as spheres as shown below on the left.
Display Structure through Filter
Select the entire structure and click in order to change everything to spheres. Click  . This opens a drop down window that allows you to display only side-chains, backbone, cysteines, hydrophobic, polar, or positively or negatively charged residues. Select hydrophobic residues. Click and select a color; hydrophobic residues are shown in green in the figure above on the right.
5.) Compare Structures
To compare the original PDB structure for 1P68 to the structure generated after running Prepare, select 1P68 on the left and click  . In the drop down window, select prepared 1P68.
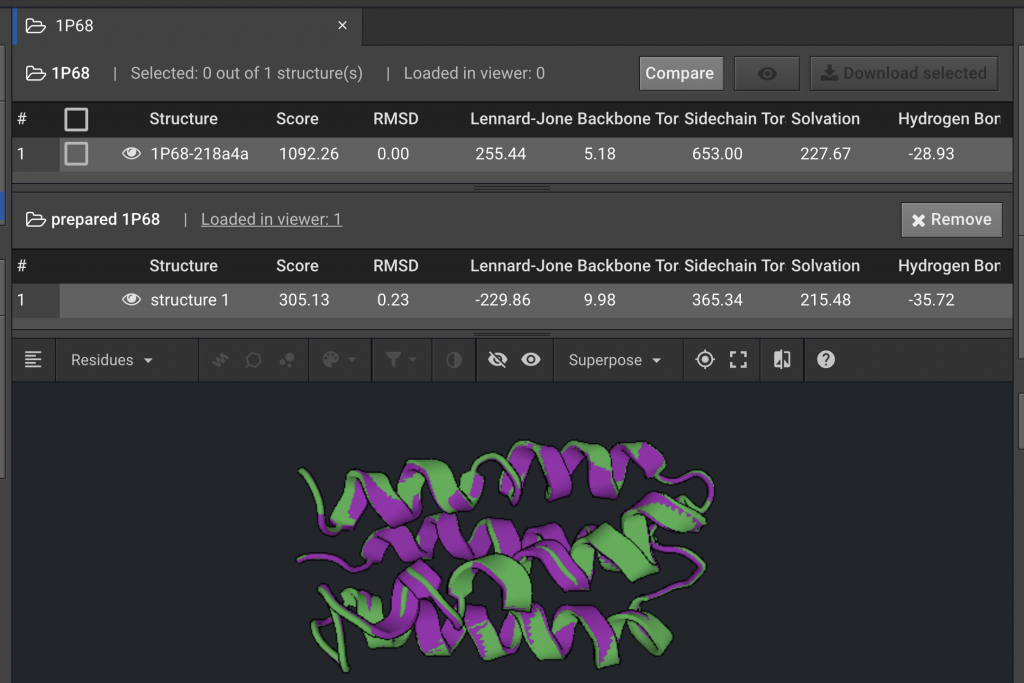
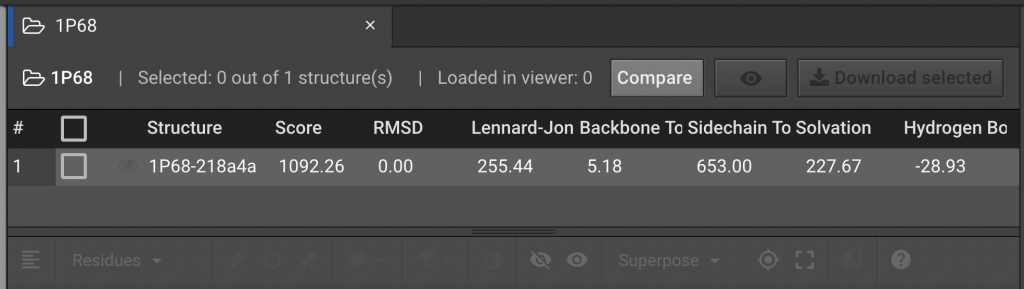
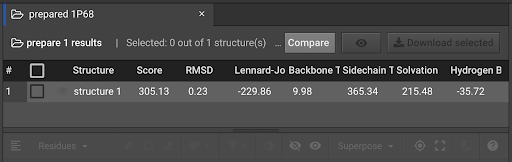
Comparing Energy Scores between Two Structures
The comparison above shows that after the Prepare function was run, the Score for the energy of the 1P68 structure was lowered from a score of 1092.26 to 305.13 Rosetta Energy Units (REUs). The individual components for the REU Score are listed to the right. In this example, the decrease in the Lennard-Jones and Side-Chain component scores were the major contributors to the lower REU score. This indicates that the atomic proximity and side-chain rotamers moved into more favorable positions.
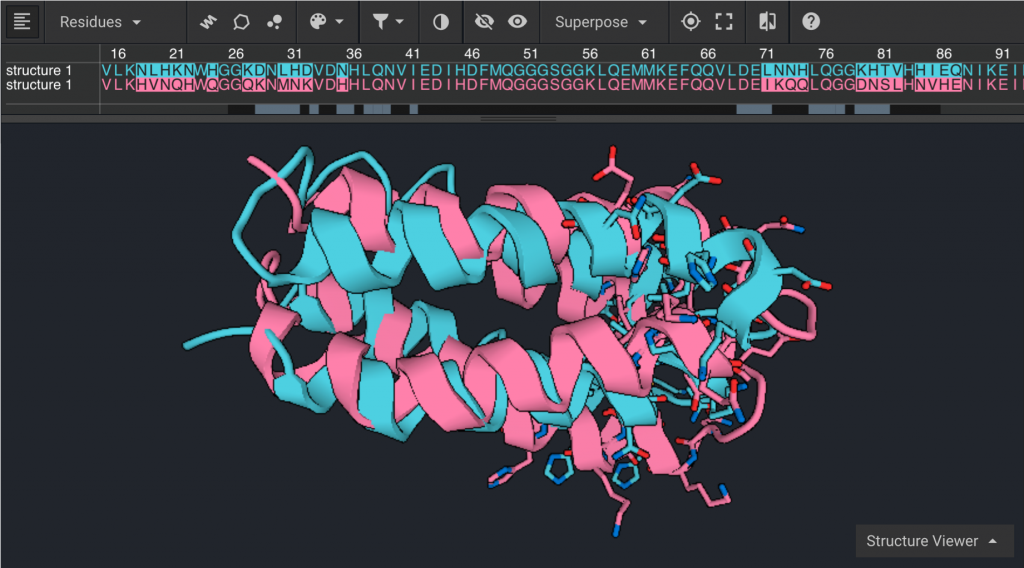
Using the Structure Viewer to Compare Structures
To visually compare two structures using the Structure Viewer click the to the left of the structure ID to ensure that both structures are visible. Click to show the sequences and ensure that the structures are displayed in two different colors such as green and purple as shown above.
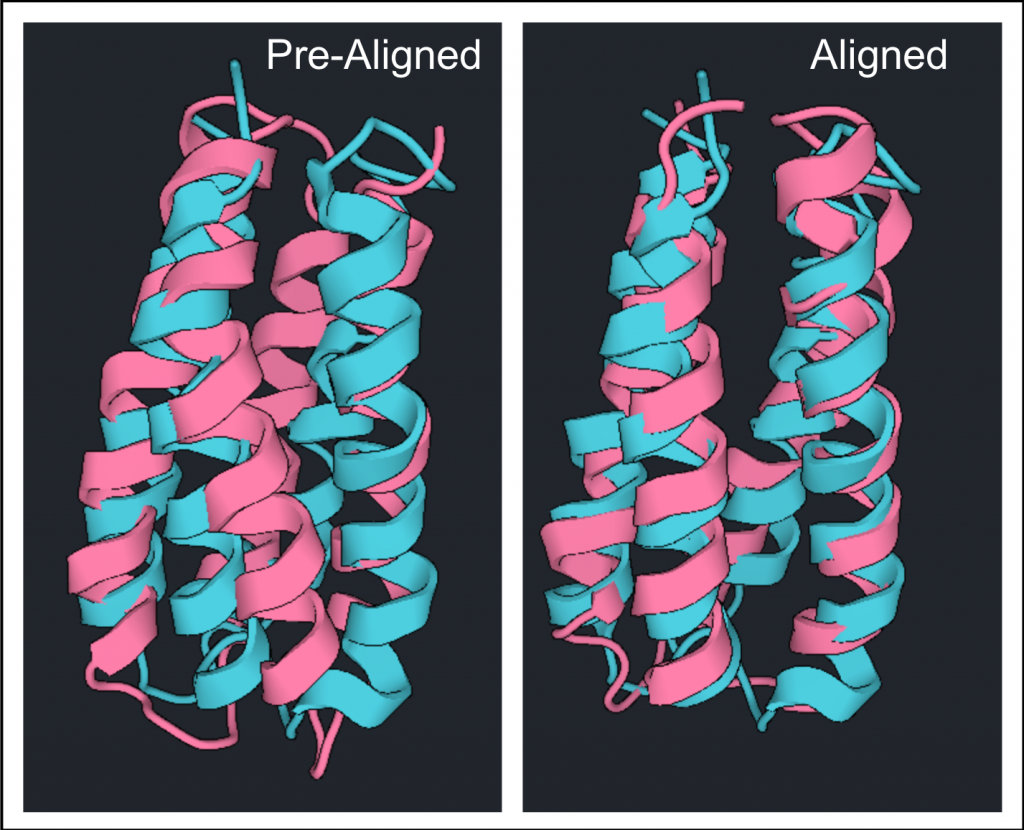
To compare structures originating from different PDBs they must first be aligned. Here the prepared structure of 1P68 will be compared to the prepared structure of 2JUA. Reset the Structure Viewer for prepared 1P68 by clicking X on the tab. Select prepared 1P68 from the left window and click , then select prepared 2JUA. Be sure that both structures are visible by clicking the and make sure they are not the same color. In order to align them select both structures by double clicking one structure and then holding down the command (Mac) or Control (PC) key and double clicking on the other structure. Click  to open a drop down, then click
  .
.
The differences between these two structures can be highlighted by clicking  . Click to show the differences as side chains as shown below.