Design a Protein to Affect Affinity to B-Cell Antibodies
BACKGROUND
B Cells can have surface antibodies that can bind proteins. This can elicit an immune response if other factors are present to activate the B Cell. One way to increase or decrease antibody binding to a protein is to alter its surface residues, changing the propensity of antibodies to bind. Here, we present a workflow for designing B Cell antibody binding into or out of your protein. It is based on this paper:
The paper describes a method for predicting the propensity of an antibody to bind to your protein. It uses a protein structure rather than sequence. This has been shown to be more predictive than sequence-based prediction of antigen binding. It’s called DiscoTope because it can predict epitopes on discontinuous regions based on structure, not sequence. Plus, >90% of B Cell epitopes are predicted to be discontinuous.
EPITOPE SCORING
Antibodies are known to prefer binding regions that are on the surface, are hydrophilic, flexible, and are often β-turns. This work expands that knowledge by using X-ray crystal structures of antibody-antigen pairs to analyze the interacting residues. They have developed a scoring method that uses a log odds ratio for each amino acid, reflecting its propensity for being in an epitope region. Epitopes are more likely to have N, R, P, K and not C, A, L, V, F. The log odds score is the average of log odds over 9 sequential residues.
DiscoTope Score = (log odds score summed for structurally proximal residues) + (score term for surface localization)
WORKFLOW
We are showing an example on how to design your protein in order to decrease binding by an antibody. This workflow could hypothetically be done in reverse to increase binding.
EXAMPLE: DE-IMMUNIZATION OF AMA1
Here, we will decrease antibody binding to the Malaria antigen (AMA1). AMA1 is known to bind an inhibitory monoclonal antibody. Below, we are showing the crystal structure, 2Q8A, which has AMA1 (blue) bound to the heavy (dark green) and light chain (light green) Fab of 1F9. The interacting residues colored in purple for the Fab and yellow for AMA1. Below-left shows the complex. Below-right zooms in on the interacting residues.
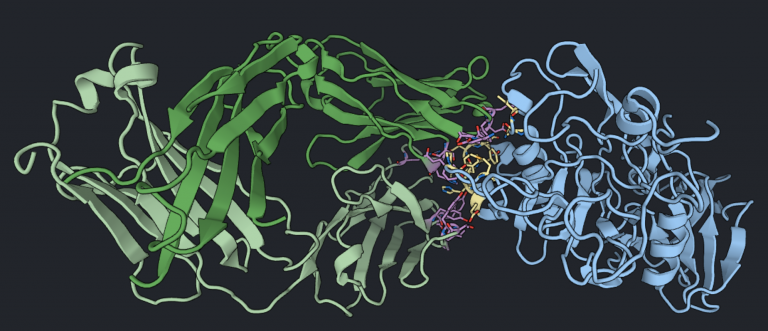
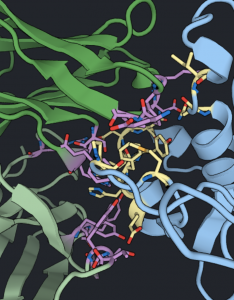
This shows that there are known antibody binding sites. However, we are using the crystal structure, 1Z40 of the unbound AMA1 in order to predict binding sites for any antibody.
1) Identify “sticky” regions – regions that B cell antibody are predicted to bind
Go to http://www.cbs.dtu.dk/services/DiscoTope/ and run the free online tool in order to get predictions of where an antibody is likely to bind. They also have a downloadable version. We may soon have a version that you can use in Bench if interest is found among users. Contact support@levitate.bio if you are interested.
A DiscoTope run should take under a minute. Download the results files which is shown below. The DiscoTope score is weighted by the # of amino acids in its proximity, which helps select residues at the surface.
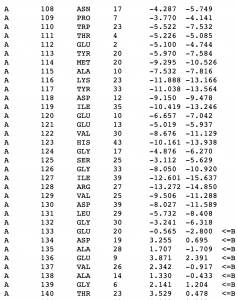
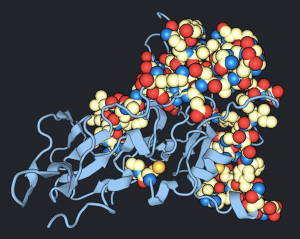
In this example above, DiscoTope Identified 76 B-Cell epitope residues (yellow) out of 311 total residues (blue). These are all potential spots for design. This seems like a daunting task since 76 mutation positions could drastically alter protein structure. But not all sites need to be mutated in order to drastically reduce the probability of antibody binding (if that is your goal).
The regions that are considered “sticky” will be indicated in the results file by <=B. Keep in mind that the numbering relates to the numbering structure of the file it is analyzing Bench numbering may be different. To make the numbering match Bench, upload your structure into Bench, then download it from Bench. The new structure will have Bench numbering. So use this pdb to load into DiscoTope for analysis. And the results file will be much easier to correlate to the structure in Bench.
2.) Select small regions for design
For most cases, there will be a lot of positions around the protein that require redesign. These should first be split into multiple regions for design. Then, run multiple, separate design runs with a lot of repeats within each design set. Once individual sets are run, the results are used to determine mutations that are tolerated at each position. This data will be used for a final design run using these tolerated mutation list. The philosophy behind this is that subsets will eliminate unfavorable mutations, then all interacting regions can be designed using these most probable mutations. The final design will be able to focus it’s sampling on fewer mutations so it can better determine which ones are the best. Running design without doing this pre-Design elimination will allocate a lot of time toward eliminating bad mutations and less time toward sampling the ideal combination of good mutations.
We suggest each design subset include up to 6 interacting residues or up to 6 residues that cluster into the same region. Below, these pre-Design sites are split into 9 design sets, which are shown in 9 different colors. Non-design positions are in blue. Since interacting residues are best designed in the same set, large regions must be divided with that in mind.
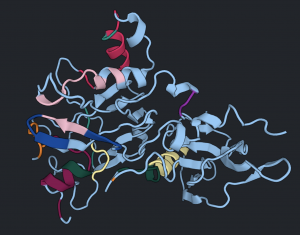
Create Selectors for all of these individual sets. For many situations, it is challenging to split the job into well-defined subsets. So you can include more subsets that have overlapping regions with other subsets. That expands sampling which can prevent incorrect elimination of tolerated mutations. In the example below, there are 3 sets selected for design on the left. On the right, the same positions are split into 5 sets. All 8 sets can be run to see if different mutations are tolerated with different regions included. This allows different co-mutating positions to be sampled.
3) Run Pre-Design jobs for all subsets
For each design set, run Design, Flex Design, or Relax Design. Determine which residues you will allow mutable positions to sample depending on the known propensity of antibody binding. See the Log Odds Ratio of antibody binding below. It is best to avoid mutating native cysteines or prolines. Cysteines are often involved in disulfide bonds. So, removing them could significantly alter the structure. Prolines form a unique, rigid backbone orientation so removing them can also greatly alter the structure. Also, it is recommended to avoid creating new cysteines because they can form new disulfide. Creating prolines is particularly destructive in secondary structures. Though, Rosetta’s energy function will usually select against this kind of mutation.
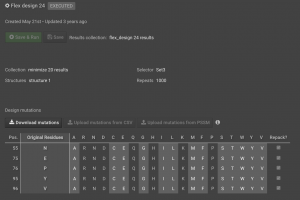
In the AMA1 example, there were 76 positions predicted to be “sticky” to antibodies. This is an exceptionally large number and represents an extreme case. Since this is an example of design and not a real life project, we are not taking into account that functional sites are usually excluded from design in order to maintain behavior. So, we will allow mutation at all 76 positions. We are making this an aggressive design by allowing all mutation except the 7 residues which have the highest Log Odds score (above). Since that allows sampling of 13 residues per position, we only allow 4 or 5 residues per pre-Design run across up to 1,000 repeats. A conservative variation would select mutations with similar properties, but a better Log Odds score.
HOW TO ANALYZE PRE-DESIGN RESULTS
Each pre-Design run will sample all 13 residues, but will probably only favor a couple amino acids at each spot. Occasional sets will favor more than that because the protein doesn’t depend on the side chain for structural stability. Look at the Sequence Logo for each pre-Design run in order to select the favorable mutations at each position. In the example below, there are 5 mutatable positions and the vast majority of the repeats for this design region selected one residue as favorable.
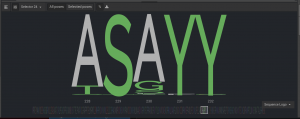
The wild type sequence was PKQYE, but the first 3 are residues are preferred antibody binding residues so were not allowed for sampling. Rosetta found that (of the allowed residues), the most favorable sequence is ASAYY. For other regions of the protein, a few favored residues were chosen. So a few mutations can be selected when mutating the whole protein.
Once all pre-Design runs have been analyzed, you will have a list of favored mutations for all mutatable positions in the protein. This is usually a much more tractable number of mutations to sample in a single design run.
4) Make a final design run using pre-Design data
Pre-Design runs should have vastly limited the number of allowable mutations that you need to sample for the final design. So you only need to compile a list of all residues that will be mutated and the favorable mutations from the pre-Design runs. Use these for a Design with an appropriate number of repeats.
[Number of Repeats = # of Permutations / 50]
Calculating # of Permutations: If you have 3 mutation positions with 13 mutations allowed at each spot, the # of permutations = 13 x 13 x 13 = 2,197. This needs 44 repeats for complete sampling. Note that running more than the suggested number of repeats won’t make your results worse, but will require more compute cycles and take longer to finish.
While running design, the structure will not find its energetic minimum because sampling is more focused on design. So the final structure should be submitted to at least 100 Relax repeats before analysis. For design situations that include a large number of residues, it is often necessary to run multiple rounds of Relax to find the energetic minimum. This should also be done to the wild type in order to have an appropriate structure for comparison.
In the case of AMA1, design was aggressive in the sense that the 7 amino acids with higher propensity for binding antibodies were not allowed at design regions. Proteins rarely retain their structure and function with this level of mutation. So, the original residues should usually be allowed during mutation sampling.
The mutated structure has no positions predicted to bind a B-cell antibody based on its DiscoTope score. So, the final structure appears to be stable, maintain the same global fold, and is not predicted to bind B-cell antibodies.